User Accounts
This user guide provides comprehensive guidance on managing contacts and user accounts, including details on user permissions. Creating, administering, editing, or revoking permissions should adhere to your organisation’s internal policies and procedures. Ensure that proper approval is obtained before making any updates.
Giving Staff Access
Three steps are required to set up most user accounts:
- Create a Contact
- Create an associated User Account
- Assign Roles - or more granular Permissions
- Confirm creation
1. Create a Contact
A contact must be established before creating a user account.
-
In the side menu, click on ‘Clients’, then ‘Settings’
-
Navigate to the ‘Contacts’ tab, and click the ‘Add Contact’ button
-
Fill in the required fields (position, first name, last name, mobile, email)
-
Manually enter address details, or select ‘Populate Address Fields’ to use your company’s default address
-
Click Save & Create User to automatically be taken to the next step
2. Create a User Account
This step is to set up the users log-ins and invite them to access their account.
-
Click on the User Accounts tab, then click ‘Create Account’
-
Select the matching contact from the Contact drop-down list
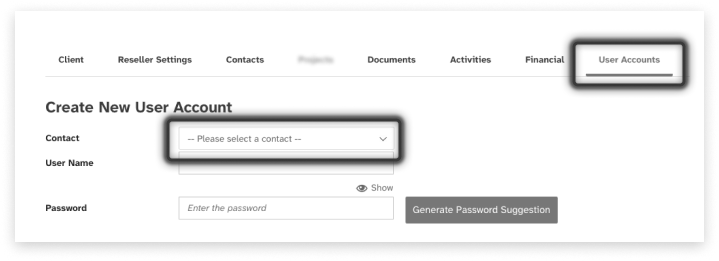
- click ‘Generate Password Suggestion’
3. Assign Roles or Permissions
This step is to ensure the user has the correct level of access.
We have dedicated a separate page to the assigning of Roles - or more granular Permissions
4. Confirm Creation
Click ‘Create Account’ - this will send an invitation with a link to create a new password, to the new User
Unlocking Locked User Accounts
Entering an incorrect password 5 consecutive times will result in the User Account being locked, this can only be unlocked by an Admin user.
-
Click on ‘Clients’ in the side menu, then ‘User Accounts’
-
Toggle Account Status from ‘Active Accounts’ over to ‘Inactive Accounts’
-
Use the Search field to locate the user that needs to be reactivated; click on the User Name (not the Contact)
-
Tick the ‘Active’ checkbox and click ‘Update Account’
This will re-activate their locked account and allow them to attempt to re-access, again. See below for suggested communications to the user.
Email Template: Unlocked Account
Hi [person],
Your user account for [Modica] has been reactivated.
To reset your password, please follow the ‘forgot password’ path available on the login page.
Kind regards, [Name]
Removing Staff Access
To remove access from a User Account and maintain data-cleanliness within your account, we recommend following both steps below.
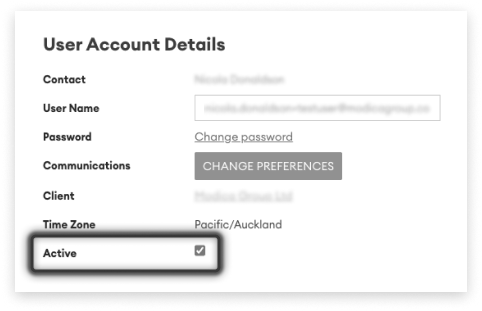
Step 1 - Make User Account Inactive
-
Navigate to the User Account area, locate the User Account to remove access for
-
Untick the ‘Active’ checkbox
-
Click ‘Update Account’
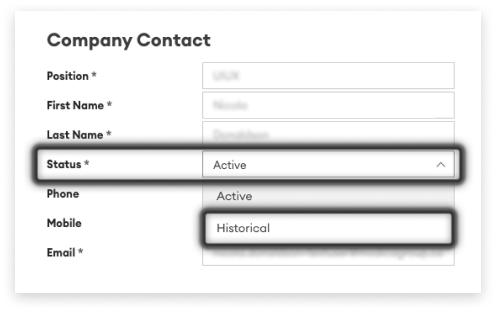
Step 2 - Archive the Associated Contact
-
Navigate to the Contacts area, locate the Contact who just had their User Account access removed
-
Locate the ‘Status’ field in the list
-
Open the drop-down and set the status to ‘Historical’
-
Click ‘Save’